> ## Documentation Index
> Fetch the complete documentation index at: https://help.miyaip.com/llms.txt
> Use this file to discover all available pages before exploring further.

# 在 Android 上使用 v2rayNG 配置原始代理

> 在 v2rayNG 中设置自备海外前置代理，并连接 MiyaIP 静态住宅 SOCKS5 原始代理。

本教程适用于你已准备好海外网络节点，并需要在 Android 上连接 MiyaIP 静态住宅原始代理的情况。

从 [v2rayNG 官方发布页](https://github.com/2dust/v2rayNG/releases)下载并安装 v2rayNG。你需要能够访问 GitHub 的网络环境。

## 设备准备

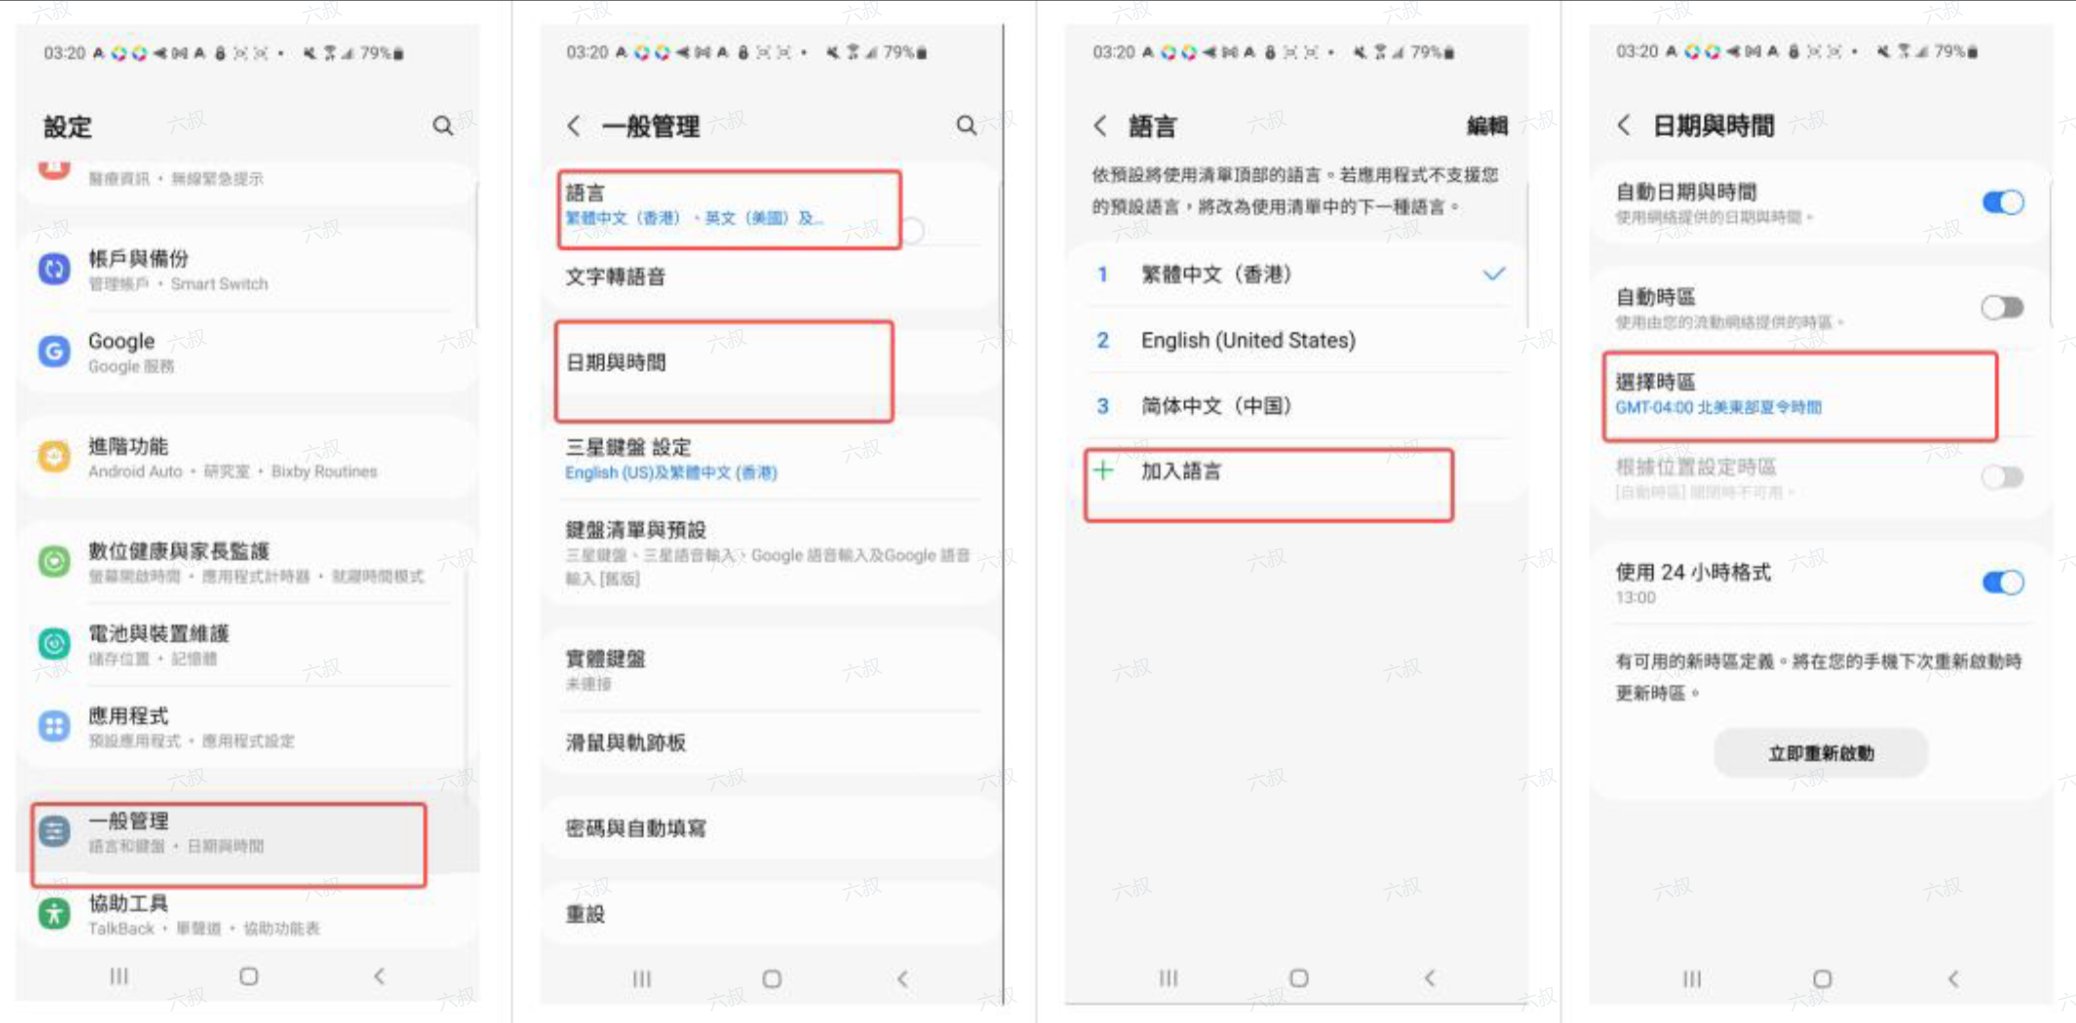
1. 打开手机 **设置**，将日期与时间的 **时区**、**语言和地区** 调整为代理 IP 的目标国家或地区。不同 Android 设备的菜单名称可能不同。选择目标国家的语言，避免使用简体中文。

<Frame>
  <img src="https://mintcdn.com/miya-556b3641/O3phwvGYo_Abg4HD/images/tutorials/o_and_v2_1.png?fit=max&auto=format&n=O3phwvGYo_Abg4HD&q=85&s=debecbec60329e054dc8b9322868f279" alt="在 Android 上调整日期、时间、语言和地区" style={{ width: "100%", maxWidth: "480px" }} width="2076" height="1023" data-path="images/tutorials/o_and_v2_1.png" />
</Frame>

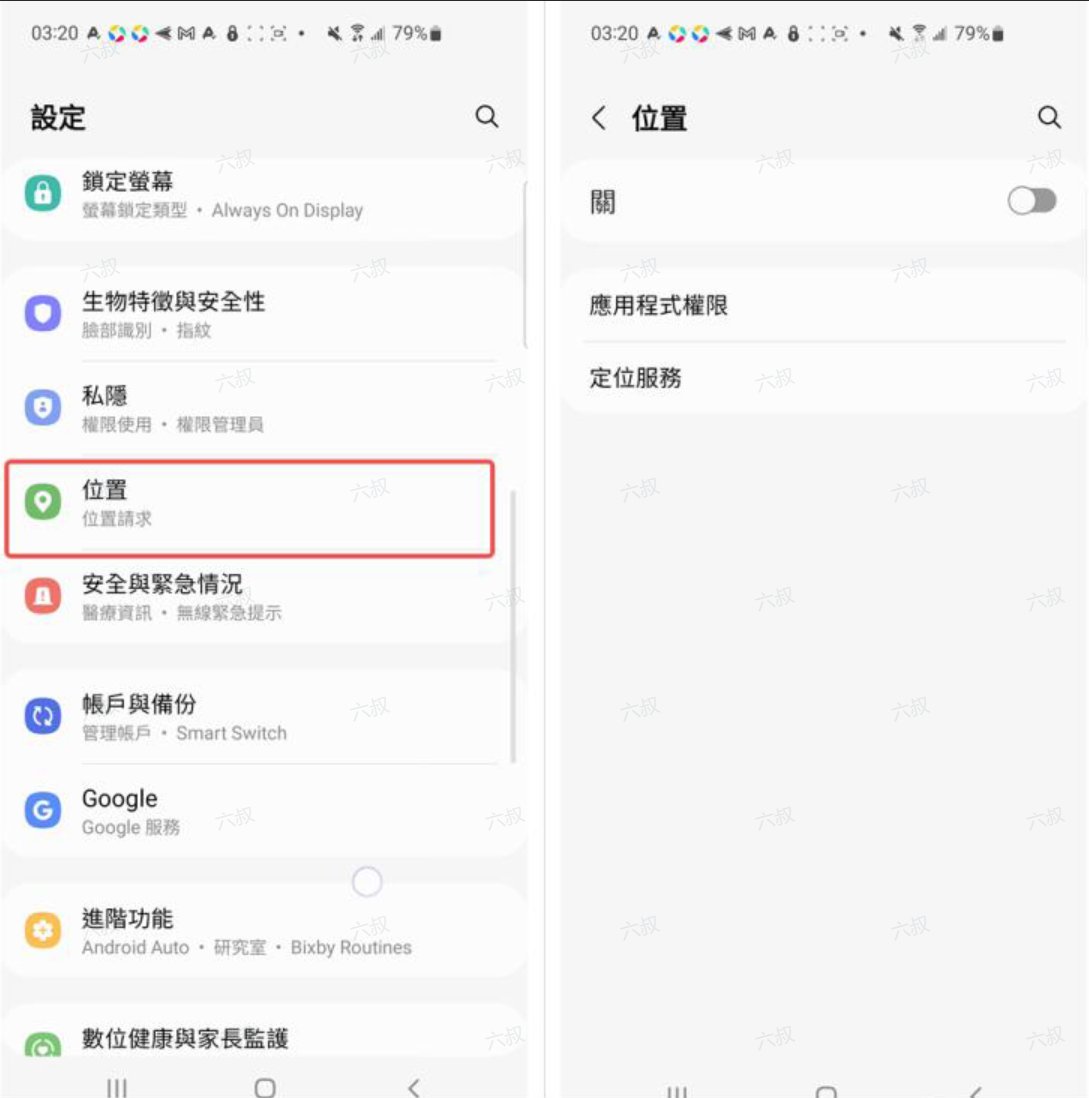
2. 在手机 **设置** 中找到 **位置**，关闭定位功能。

<Frame>
  <img src="https://mintcdn.com/miya-556b3641/O3phwvGYo_Abg4HD/images/tutorials/o_and_v2_2.png?fit=max&auto=format&n=O3phwvGYo_Abg4HD&q=85&s=1bf38faac3a691751d81d5cf4f3c75ad" alt="在 Android 设置中关闭位置功能" style={{ width: "100%", maxWidth: "480px" }} width="1089" height="1098" data-path="images/tutorials/o_and_v2_2.png" />
</Frame>

你也可以参考[设备准备](/zh/device-preparation)了解这些设置。

## 连接前的准备

* 在 Android 手机上安装 **v2rayNG**，并准备好可用的海外网络节点，作为第一层网络环境。
* 在 MiyaIP 后台准备好静态住宅 **原始代理** 的 SOCKS5 凭据：**主机、端口、用户名和密码**。

## 配置步骤

<Steps>
  <Step title="导入并编辑海外节点">
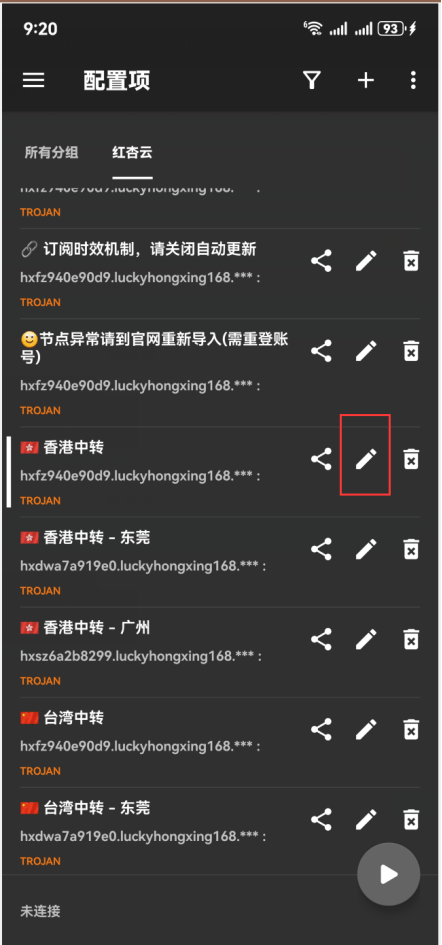
    将你自备的海外网络节点导入 v2rayNG。选择一个可用节点，点击它右侧的 **编辑按钮**。

    <Frame>
      <img src="https://mintcdn.com/miya-556b3641/O3phwvGYo_Abg4HD/images/tutorials/o_and_v2_3.png?fit=max&auto=format&n=O3phwvGYo_Abg4HD&q=85&s=c88a87de195f335a0545c941ba8b5512" alt="在 v2rayNG 中选择并编辑自备的海外网络节点" style={{ width: "100%", maxWidth: "480px" }} width="442" height="945" data-path="images/tutorials/o_and_v2_3.png" />
    </Frame>
  </Step>

  <Step title="设置唯一的节点名称">
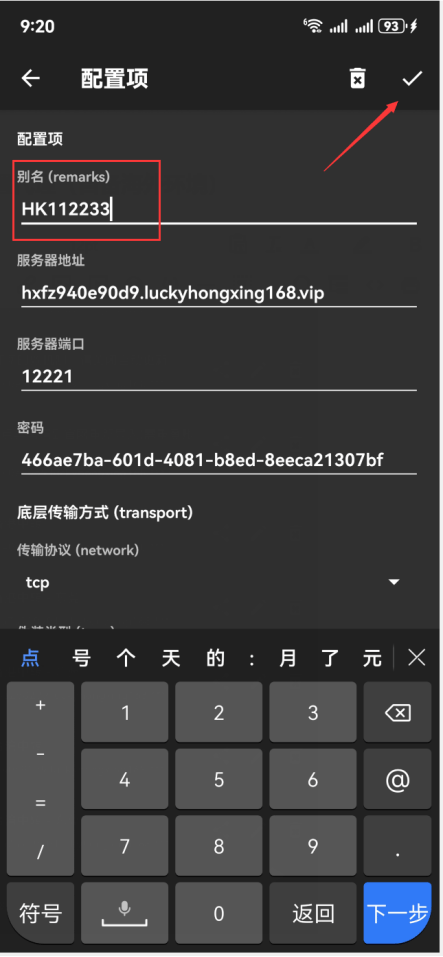
    修改海外节点的 **名称**，确保它不与其他节点重名。点击右上角的 **✓** 保存，并记住这个名称。

    <Frame>
      <img src="https://mintcdn.com/miya-556b3641/O3phwvGYo_Abg4HD/images/tutorials/o_and_v2_4.png?fit=max&auto=format&n=O3phwvGYo_Abg4HD&q=85&s=9c91af606a425253a0c71e781b7a6cfb" alt="为海外网络节点设置唯一名称并保存" style={{ width: "100%", maxWidth: "480px" }} width="443" height="957" data-path="images/tutorials/o_and_v2_4.png" />
    </Frame>
  </Step>

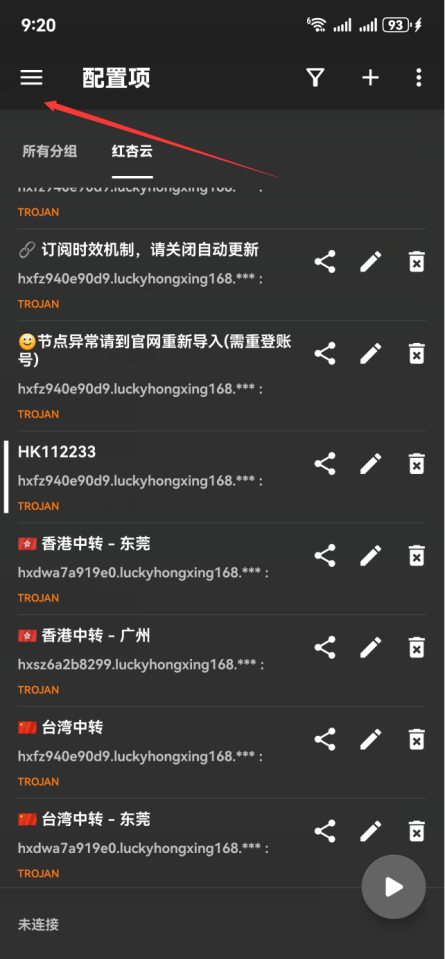
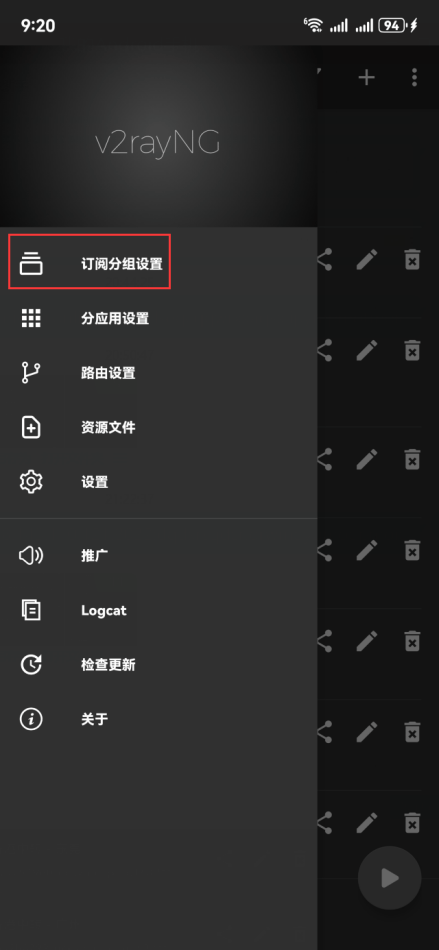
  <Step title="打开订阅分组设置">
    点击左上角的 **三条横线按钮**，然后选择 **订阅分组设置**。

    <Frame>
      <img src="https://mintcdn.com/miya-556b3641/O3phwvGYo_Abg4HD/images/tutorials/o_and_v2_5.png?fit=max&auto=format&n=O3phwvGYo_Abg4HD&q=85&s=ee84149e50a9e5a453282f76e74df823" alt="打开 v2rayNG 左上角的侧边菜单" style={{ width: "100%", maxWidth: "480px" }} width="445" height="959" data-path="images/tutorials/o_and_v2_5.png" />
    </Frame>

    <Frame>
      <img src="https://mintcdn.com/miya-556b3641/O3phwvGYo_Abg4HD/images/tutorials/o_and_v2_6.png?fit=max&auto=format&n=O3phwvGYo_Abg4HD&q=85&s=c867d1a1528583dcfc3521c141c9bb67" alt="在 v2rayNG 菜单中选择订阅分组设置" style={{ width: "100%", maxWidth: "480px" }} width="439" height="950" data-path="images/tutorials/o_and_v2_6.png" />
    </Frame>
  </Step>

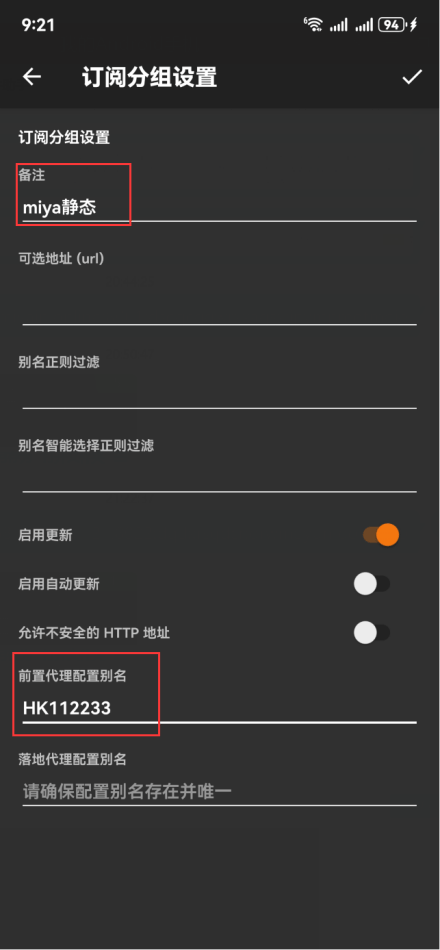
  <Step title="创建带前置代理的分组">
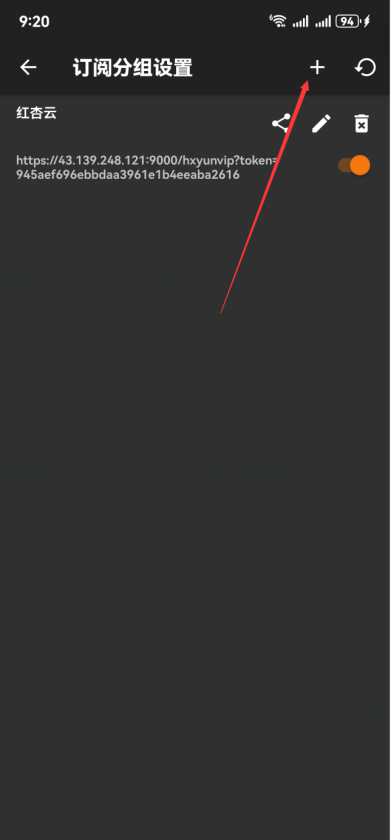
    点击右上角的 **加号** 添加分组。填写 **备注**，并在 **前置代理** 中填入刚才设置的海外节点名称。点击 **✓** 保存。
    <Frame>
      <img src="https://mintcdn.com/miya-556b3641/O3phwvGYo_Abg4HD/images/tutorials/o_and_v2_7.png?fit=max&auto=format&n=O3phwvGYo_Abg4HD&q=85&s=d3a2ca0f73176c86f15c215540cc1ee1" alt="点击订阅分组页面的加号添加分组" style={{ width: "100%", maxWidth: "480px" }} width="391" height="840" data-path="images/tutorials/o_and_v2_7.png" />
    </Frame>

    <Frame>
      <img src="https://mintcdn.com/miya-556b3641/O3phwvGYo_Abg4HD/images/tutorials/o_and_v2_8.png?fit=max&auto=format&n=O3phwvGYo_Abg4HD&q=85&s=fca36d72ed67e263dc0e770f2402c070" alt="设置订阅分组备注和海外前置代理名称" style={{ width: "100%", maxWidth: "480px" }} width="440" height="950" data-path="images/tutorials/o_and_v2_8.png" />
    </Frame>
  </Step>

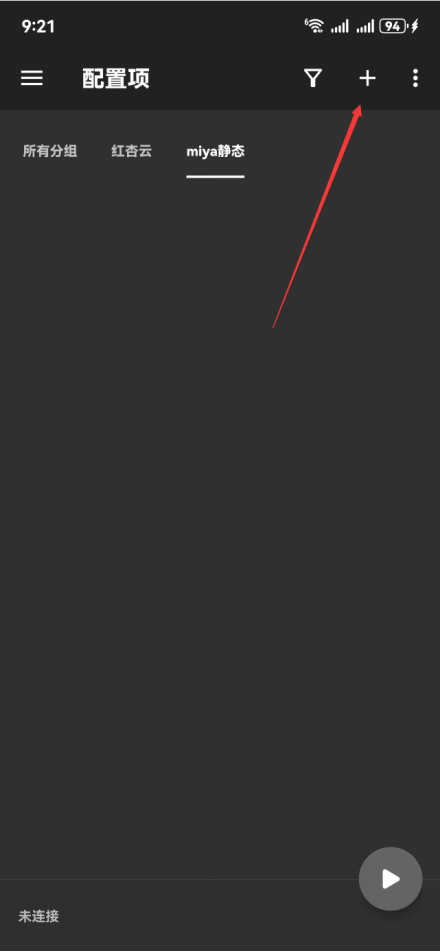
  <Step title="添加 SOCKS5 静态 IP 节点">
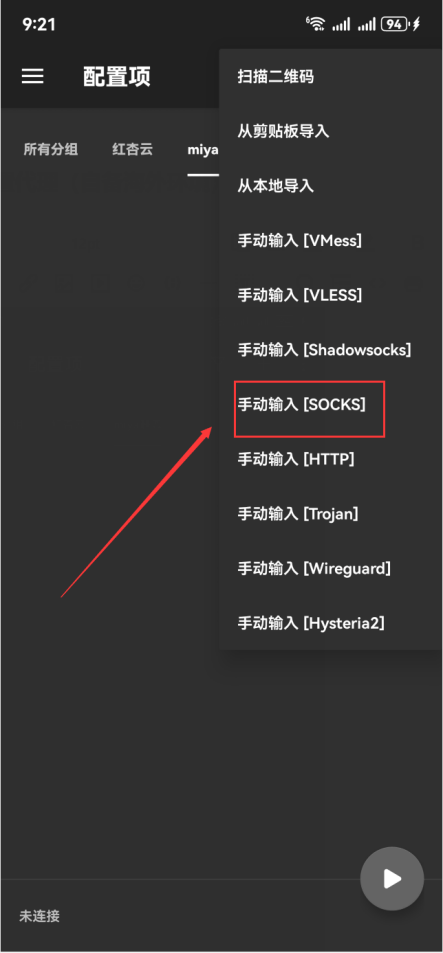
    返回节点列表，在刚创建的分组中点击右上角的 **加号**，选择 **手动输入**，使用 **SOCKS5** 协议添加静态 IP 节点。

    <Frame>
      <img src="https://mintcdn.com/miya-556b3641/O3phwvGYo_Abg4HD/images/tutorials/o_and_v2_9.png?fit=max&auto=format&n=O3phwvGYo_Abg4HD&q=85&s=0adf823f716832ed65dea7c36801d9a4" alt="在 v2rayNG 节点列表中点击加号" style={{ width: "100%", maxWidth: "480px" }} width="440" height="952" data-path="images/tutorials/o_and_v2_9.png" />
    </Frame>

    <Frame>
      <img src="https://mintcdn.com/miya-556b3641/O3phwvGYo_Abg4HD/images/tutorials/o_and_v2_10.png?fit=max&auto=format&n=O3phwvGYo_Abg4HD&q=85&s=1a322e978a90670fa102890020452227" alt="选择手动输入 SOCKS5 节点" style={{ width: "100%", maxWidth: "480px" }} width="443" height="953" data-path="images/tutorials/o_and_v2_10.png" />
    </Frame>
  </Step>

  <Step title="填写 MiyaIP 代理凭据">
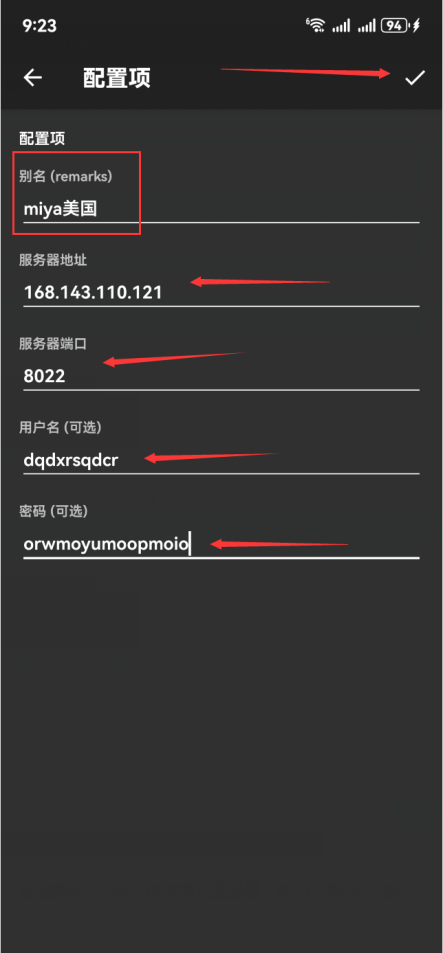
    填写静态 IP 节点的 **备注**。将 MiyaIP 原始代理的 **主机、端口、用户名和密码** 分别填入 **服务器、端口、用户和密码** 字段，然后点击右上角的 **✓** 保存。

    <Frame>
      <img src="https://mintcdn.com/miya-556b3641/O3phwvGYo_Abg4HD/images/tutorials/o_and_v2_11.png?fit=max&auto=format&n=O3phwvGYo_Abg4HD&q=85&s=727b815535ce22a07e90b94a65805ebf" alt="填写 MiyaIP 静态住宅 SOCKS5 凭据并保存节点" style={{ width: "100%", maxWidth: "480px" }} width="443" height="953" data-path="images/tutorials/o_and_v2_11.png" />
    </Frame>
  </Step>

  <Step title="连接并测试延迟">
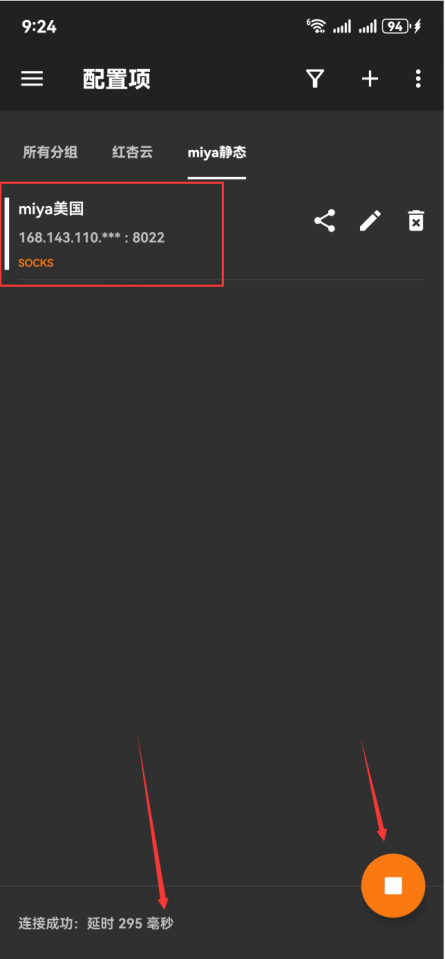
    选择刚配置好的 **MiyaIP 静态 IP 节点**，点击下方的 **启动按钮**。点击主页面的 **空白区域** 进行延迟测试。

    <Frame>
      <img src="https://mintcdn.com/miya-556b3641/O3phwvGYo_Abg4HD/images/tutorials/o_and_v2_12.png?fit=max&auto=format&n=O3phwvGYo_Abg4HD&q=85&s=c87125e9af3511cd03a99c6d460d4421" alt="选择 MiyaIP 静态 IP 节点并启动连接和延迟测试" style={{ width: "100%", maxWidth: "480px" }} width="445" height="959" data-path="images/tutorials/o_and_v2_12.png" />
    </Frame>
  </Step>

  <Step title="核验出口 IP">
    延迟测试有响应后，在浏览器中打开 [whoer.net](https://whoer.net)。确认显示的 **IP 地址** 与你购买的 MiyaIP 静态住宅 IP 一致，并检查 **国家或地区** 是否符合预期。
  </Step>
</Steps>